As educators and therapeutic professionals (RBTs, BCBAs, OTs), we know that simply telling a dysregulated child to “calm down” is rarely effective. In fact, during a moment of high anxiety or frustration, a child’s ability to process auditory language significantly decreases. They hear the noise of our voice, but not the meaning of our words.
This is where visual supports specifically a Calm Toolkit become an essential antecedent strategy.
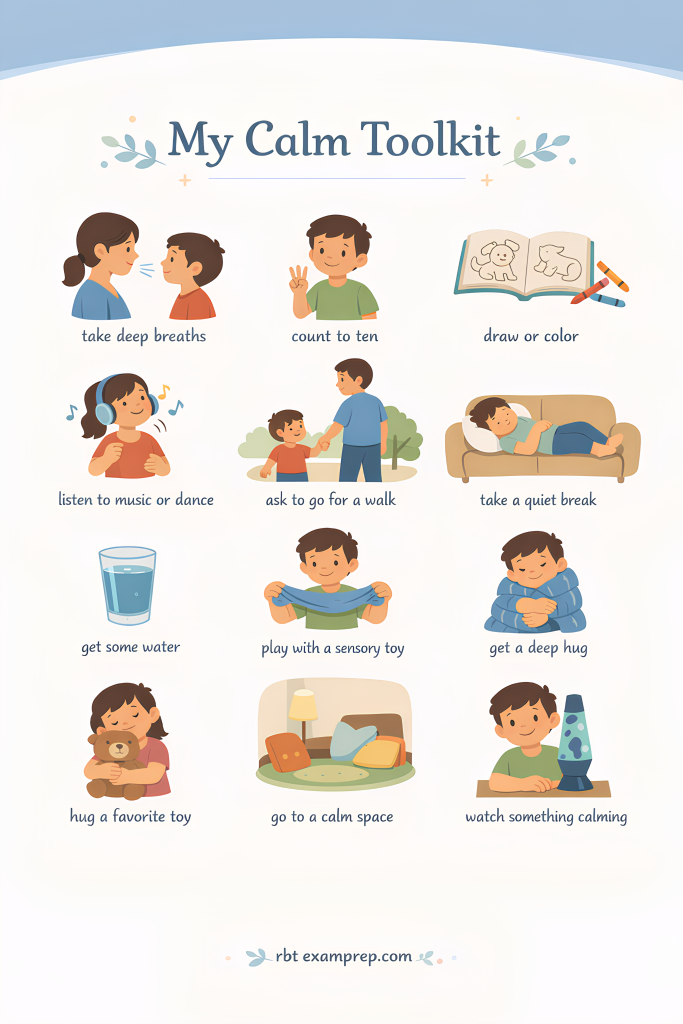
Emotional regulation is not an innate trait; it is a learned skill. Just as we teach phonics or math, we must explicitly teach children how to modulate their emotional state. Today, we are breaking down the “My Calm Toolkit” graphic and discussing how to implement it effectively in a classroom or clinic setting.
Why Visuals Work During Dysregulation
When a child enters a “fight, flight, or freeze” state, their prefrontal cortex (responsible for logic and decision-making) goes offline. Visuals bypass the need for complex auditory processing. A picture of a glass of water is immediate and concrete.
The “My Calm Toolkit” chart serves three clinical functions:
- Communication Bridge: It gives non-verbal or selectively mute children a way to express their needs.
- Forced Choice: It provides autonomy within boundaries. Instead of an open-ended “What do you need?”, which can be overwhelming, it offers a finite set of safe options.
- Replacement Behaviors: It offers functional alternatives to maladaptive behaviors (e.g., squeezing a sensory toy instead of hitting).
Deconstructing the Toolkit: A Multi-Sensory Approach
What makes this specific toolkit effective is its variety. It addresses different sensory profiles. When introducing this to your client or student, it helps to categorize the options so they understand why they are choosing them.
1. The “Reset” Tools (Biological & Physiological)
- Items: Get some water, Take deep breaths, Take a quiet break.
- The Goal: These address immediate physiological stressors. Dehydration or shallow breathing can exacerbate anxiety. A quiet break reduces sensory overload.
2. The “Motor” Tools (Vestibular & Proprioceptive)
- Items: Ask to go for a walk, Listen to music or dance, Play with a sensory toy, Get a deep hug.
- The Goal: For the “sensory seeker,” sitting still is impossible. Heavy work (proprioception) via a deep hug or squeezing a toy provides grounding input. Vestibular movement (walking/dancing) helps regulate arousal levels.
3. The “Focus” Tools (Cognitive distraction)
- Items: Count to ten, Draw or color, Watch something calming, Hug a favorite toy.
- The Goal: These shift the child’s focus away from the trigger and onto a neutral or pleasant task, allowing the cortisol levels to drop.
Implementation: How to Use This in Your Practice
Hanging the poster on the wall is only the first step. For this to be a functional tool, we must move through the phases of learning.
Phase 1: Priming (The Neutral State)
Never introduce the toolkit for the first time during a meltdown. Introduce it when the child is calm. Roleplay the options.
- Teacher: “Show me how we take deep breaths.”
- Therapist: “Let’s practice counting to ten before we start our game.”
Phase 2: Prompting ( The Pre-Crisis State)
Catch the behavior early. When you see the precursors to a behavior (clenched fists, whining, restlessness), gesture to the chart.
- Verbal Prompt: “You look frustrated. Pick a tool.”
- Gestural Prompt: Simply point to the chart without speaking.
Phase 3: Reinforcement
When a child independently utilizes the chart or accepts a prompt to use it, reinforce that behavior immediately. “I love how you chose to get a drink of water instead of yelling. That was a great choice.”